I'm a Blockhead
No, not a self-derogatory remark on my part--it's just the truth. I am crazy for blocking my yarny makings. Many patient souls have had to listen to me go on and on about how they should block their knits and crochets. As a result of this fixation of mine, I have amassed quite a few blocking tools over the years. I thought it would be fun to have a look at them.
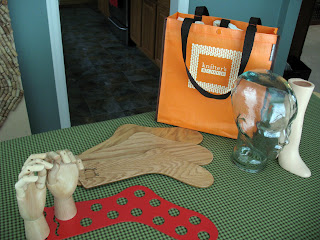
Our first is an assortment of blocking tools. From left, you see my artist's model hands obtained from Dick Blick Art Materials a couple of years ago. I bought them not only to block gloves and mitts but to take photos when I had no live model around. They are perched atop one of my plastic sock blockers. Behind them is a trio of single wooden sock blockers that I bought from The Loopy Ewe last year. As I've blogged about before, I love it that Sheri lets you buy one sock blocker at a time. I knit socks one at a time, mind you, because I like to focus. Therefore, I only need to block one sock at a time! The glass head from Pier One is great for blocking hats, and I have the requisite plastic ever-pointy foot model (given to me by the ever-generous Sonya at Yorkshire Yarns) for the occasional sock block and/or photo session. Behind it all is my latest blocking tool find, the Knitter's Block by Coco Knits. This is a really fun tool. Joyce at A Good Yarn Shop in Port Orchard let me buy her display model. Thanks, Joyce! I plan to have a lot of fun with it. Like this...

After reading about and eying longingly at wooly boards for a couple of years, I finally came off the bucks and ordered one from Halcyon earlier this year. I was immediately intrigued but also a little disappointed that the thing had such a small range of sizing. Next came Brian (of Terri & Brian) to the rescue. He used his drill press to fix me up with more holes in the wooly board parts so that I could block little sweaters-in-the-round with it. Here it is up in the office landing, newly holed and wearing my latest Raibeart sample . The wooly board is a puzzling challenge to assemble, but will come in really handy for all the ITR sweaters I make--maybe even that Fair Isle one I am trying to get up the gumption to tackle.
 Back in August, I had great help from Natalie (daughter-in-residence) in making my very own blocking board. We went to Lowe's, bought a piece of plywood, and had the guy cut it down into a couple of pieces for us. Then we went to JoAnn and got a two-yard piece of checkered fabric and to Hancock for some padding for making crib bumper pads. I wanted to be able to piece them together just right. Armed with a staple gun and glue gun (crafty artillary!) we put it all together to make a pretty cool blocking friend. I tell ya, I love this thing! It perfectly fits our little dining table and easily moves to the bed or to the floor if need be.
The last tool I'll introduce is the set of blocking wires that I bought at The Yarn Stash in Burien last winter. I finally tried them out on a sample of my Fern Lace Scarf made with the long-defunct kid-n-ewe. I can't wait to use these wires on expansive lace projects (on the needles as we speak) and even for sweaters. They make it easier to get your edges long and even.
 Another fast friend of mine that you can see in this picture is the humble T-pin. I used to use regular plastic round-headed ones, but I find myself going for these guys all the time now. I have a couple of different sizes of them for fitting to the particular blocking project.
There you have just a glimpse into my blocking obsession. While not a blocking tutorial, I hope I have at least introduced you to a couple of tools you might like to try so that maybe, maybe you might want to give blocking a go. I promise you'll like the result much better than having all those wadded-up, wrinkly knits around.

Comments