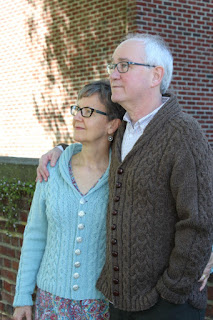
Alford Aran Cardigan Tips
Having just coached a knitter through the entire upper body of the Alford Aran Cardigan by email, I thought it would be a good idea to post a tutorial for the rest of you Alford knitters with some of the same guidance.
First of all, I'd like to add a little backstory. I named this design after my Grandaddy Dexter Alford, who left this plane in 1992, but still lives vibrantly in my heart. I made it a unisex design for anyone who wanted to wear it, and filled it with big, chunky cables. I took the basic structure of the sweater from our beloved Elizabeth Zimmermann's "Saddle-Shoulder Sweater" included in her book Knitting Workshop. Look on pages 81-82 if you have the book. If you don't have it, get that thing!
Let's go over the construction of the Alford Aran Cardigan.
The Alford Cardigan is worked from the bottom hem up to the collar, and the only seams are at the back center of the collar and at the underarms, which are grafted.
The body is knit flat, as with any cardigan, and the sleeves are knit in the round from the cuff to the underarm, where they are joined to the body stitches.
At that point, the EZ Saddle Shoulder starts and has four parts: first the body stitches are decreased, then the sleeve stitches (sorta like a raglan), then a few more body stitches are decreased to round the starting point of the shoulder, and then the saddle is worked in short rows, one shoulder at a time, decreasing the body stitches so that the saddle lays atop the shoulder just as it should.

The sweater sports a big, generous winding cable on back and chunky cables to the sides. The expanded honeycomb cable appears along the sleeve and at the sides. The button/buttonhole bands are worked in k2/p2 rib and are done as you go.
At the underarm point, the collar starts increasing to form its shawl collar shape and the neckline decreases to form a V. This is when things can become a little confusing, but there are markers placed at all points of shaping to help keep the place.
Here's a visual of the collar and neckline shaping.
The first marker is placed just after the right-front collar increase. Then there is a knit stitch, and then the decrease for the neckline is worked. The next four markers are for the armhole shaping, and then the last marker is for the left-front neck edge/collar shaping.
Then the collar is continued onto the back of the sweater, again with short rows. This is not to decrease the collar, but to join the collar to the sweater. Each half of the collar is worked to the center back neck. Then the two halves are joined with Kitchener join for 2/2 rib, which is explained in the pattern.
Here is a picture from the pattern itself to show how the decrease line goes continuously from the lower armhole all the way across the back. I just love it.
The Alford Aran Cardigan is a challenging pattern, but one I hope will either help knitters learn a few new techniques or help more advanced knitters enjoy those fun techniques.
Knit on!


Comments