Assembling a Pullover, Part Three
Thank you for joining me in this three-part tutorial on assembling a pullover. I know you're ready to finish up and wear your beautiful sweater, so let's get this done.
Now we come to seaming the side seams and sleeve seams of the pullover. This will be a breeze now that you've tackled that sleeve cap.


Now we come to seaming the side seams and sleeve seams of the pullover. This will be a breeze now that you've tackled that sleeve cap.


Let's seam the body first. As you can see, I usually like to leave a good, long tail when I cast on for each piece so that I can use that tail to seam.

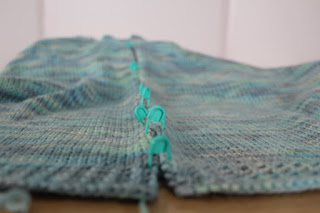
First, clip the edges together to keep your place.

To prepare for mattress stitch, make a figure eight by taking the working yarn into the first stitch opposite to where your yarn is emerging, back into the first stitch (where the yarn is originally attached) and back into the other piece again. Then tighten that up and proceed with mattress stitch.
Here is a my video on mattress stitch. I hope it's helpful!

As I have mentioned, I am working this finishing on my Figheadh Fundamental Women's Pullover, which is edged with garter rib stitch. Once you seam it, the edge is continuous. Nice.

Proceeding up the Stockinette stitch part of the body, work a few stitches and then zip them up, as we did on the sleeve cap. Keep working mattress stitch until reaching the underarm. Then cut the yarn, leaving about eight inches to weave in later.

That's when we can move on to the first sleeve seam. Clip those edges together and seam it the same way you did the body.

When you reach the underarm, you will have an intersection with all these crazy yarn ends. I had a few more than usual because this yarn is a hand-paint and I alternated skeins every two rows. When you weave in all these ends, close the hole well and weave them in opposite directions. I like to weave them into the seams--down the body and up the sleeve and then along the armhole seam one way and then the other. This keeps you from having so much bulk in any one seam.

There ya go. All ends tidied and ready to clip them a little closer. But first let's seam up the other side, add a collar, and wash and block it again. All this finishing adds yarn that has not been relaxed by washing and blocking. You will be very glad if you take that last step. If you're getting impatient, you can at least stretch out your finished sweater, pin it in shape, and spritz or steam the seams and collar. Either way, let it dry and then you can happily wear your work of art!
Thanks again for joining me! I hope this series has taken a little of the trepidation out of making a pieced sweater. See, it's not so bad!

Comments